Screen shows PWM Alarm: Troubleshooting the cause
Preface: This article covers some things to check if you get the PWM alarm on the screen
PWM alarm message:
The PWM is the signal from the controller in the machine to the fanboard that goes to the laser tube to tell the tube hot much power to output. In general it is a 0-5v signal that relates to the min and max power of the tube...say 1 to 99%.
How to fix:
Before we dive into the troubleshooting steps, lets get familiar with the components involved.
Locate the fan board:
Located in the back of the machine, near the laser tube. It is the small green printed circuit board with a bunch of white connectors and wires running to it. It will have many red lights (Red is ok..not indicating an issue).
Understanding the Fan board Layout:
Red box are the K-ON and K-OK/L-ON connectors, the red arrow is pointing to the the PWM signal input from the DSP. There are indicating LEDS above the connectors that tell the status.
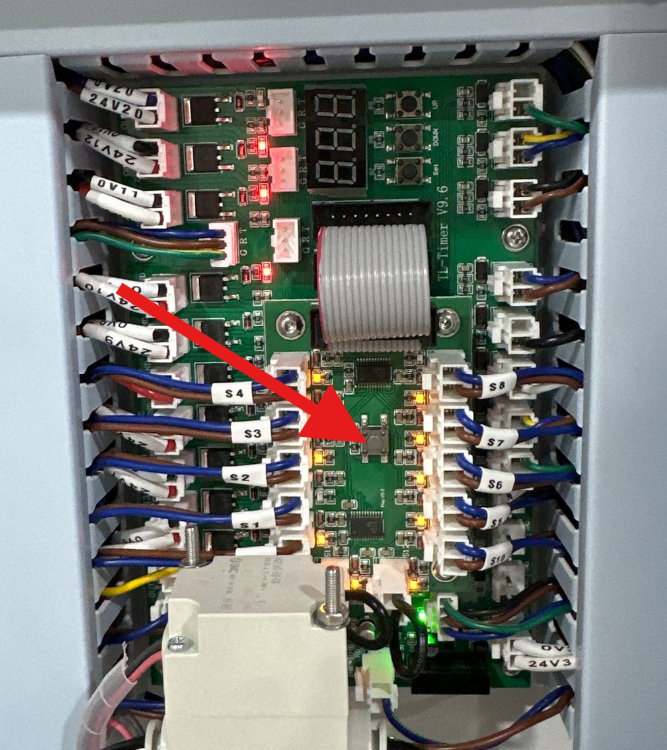
Locate the TL Timer:
The TL timer is on the left hand side of the machine, behind the door. It is the large green printed circuit board with a bunch of white connectors and wires running to it. It will have many red lights (Red is ok..not indicating an issue).
The TL timer is on the left hand side of the machine, behind the door. It is the large green printed circuit board with a bunch of white connectors and wires running to it. It will have many red lights (Red is ok..not indicating an issue).
Understanding the Fan board Layout:
In the top right and at the bottom, the K-OK, K-On and L-On wires from the fan board are connected to the TL Timer, highlighted in the red square
K-OK (In-11) | K-On and L-On |
Troubleshooting Steps:
Power up the machine and bypass the doors so that we can view the fan control board in the desired state.

While bypassed, do not operate the laser. SAFETY INFO: C02 Laser Radiation, PPE, & Fire Suppression
To bypass the doors, locate the Door board that is integrated to the TL timer and press the button shown:
Step 1: Check if K-Ok/L-ON, and K-ON connectors on the Fan board are securely connected.
Step 2. Check if K-OK/IN 11 connector on the TL board is securely connected.
Step 3. Check if these two ports on the TL board are securely connected for the shutter
Conclusion: If the above three steps check out, the LEDs on the Fan control board should light up as shown below.
Once done, you can undo the door bypass by pressing the Door Bypass Button again:
Workarounds:
Option 1:
This option will limit your machine a Class II machine. If you require a Class I machine, do not do this work around
Login to the Factory Settings option under your Menu with the password CC8888
Scroll down to the Shutter option and Selected the Closed Option

Option 2:

Only works on Class II machines that allow motion with a Door open
Before powering up your machine, open up the left hand side door. Power up the machine, allow it to complete the homing routine and then close the door.
Related Articles
Thunder Bolt Troubleshooting guide for having an Alarm Messege on the Screen
***This article is a work in progress as we coordinate translations and clarity of the message, please be patient*** Below is a list of warning messages that may appear on the screen of your Thunder Bolt Machine 1、 Warning while trying to Frame or ...Air Pressure Sensors Manuals and Technical Data
Preface: This article covers the Airtac , SMC , and YHDA air pressure sensors that were installed in and shipped on some Odin, Bolt, Titan and Nova Plus series models. Confirm your part number on your machine. Manuals are attached at the bottom of ...Alarm message of LCD panel-Water error
Preface: This article covers the possible solutions to a Water Error Work Paused alarm message that shows up on the Laser Machine Controller Screen when you try to start a job. Alarm Message On Screen: LCD panel shows the following information: Water ...Chiller Alarm signal and Cable Troubleshooting guide for Water Protect Error
This is a guide to walk through troubleshooting a Water Protection Error when starting a job on your Laser Preface: Tools you will need: Flat head screw driver Phillips head screw driver Multimeter Paper clip or Wire jumper and possibly a helper ...Nova and Nova Plus Series Machine Protected Work Paused Alarm Message
Preface: This article covers the reasons you will see the "Machine Protected Work Paused" message on your Thunder Laser Nova series machine control screen. Error message on screen: LCD panel shows the "Machine Protected Work Paused" message towards ...
If you are a Thunder Laser USA client and still need Technical Support after exhausting the resources in the Knowledge Base, simply email support@thunderlaserusa.com and the Technical Support Team will promptly assist you! You can also use the form here.
Information contained in this Knowledgebase, on this page, in this or any other Article etc. is the property of Thunder Laser USA and shall not be copied, re-used, sold etc. Do not copy, distribute, or reproduce without express written permission from Thunder Laser USA.