Titan: Connecting your control software to your Titan laser - WIFI, Ethernet and "USB" for Mac and Windows
Preface: This document briefly introduces the TITAN connection methods, helping users quickly understand how to establish connections correctly and efficiently. Depending on how the USER chooses to connect, they will need to follow the directions and adjust the values based on their specific situation. The cameras on your Titan will transmit over the Ethernet/WIFI/USBtoEthernet connection as well.

Note that a 30 minute remote session is now included for new Titan purchases to help you set up your ethernet connection.
Overview video of the connection methods:
This video is not a full "How To" connect video but an overview of what the possible methods are so that you can decide which route you want to go. It is suggested that you watch the video
Connection methods:
1. WIFI (Easiest to connect). Connects to your existing WIFI network (internet not required) . Performance will depend on your network. IP configuration can be automatic.
2. LAN via Ethernet Cable (Hardwired, best performance, most preferred). IP address assignment is manual.
3. USB to Ethernet (Windows only, short distance or a longer distance with an active repeater cable). Least preferred. IP address assignment is manual.
So, based on the above, you should pick with connection method you plan to use. Your machine could potentially connect all three ways with 3 different IP addresses.
Pick your connection Method:
You only need one connection to the machine (though you can set up all 3 if you really wanted to), so read through the three types and select from there:
WIFI ConnectionTo connect via Wi-Fi, you need to ensure that both the laser machine and your computer are connected to the same Wi-Fi network. Also note that if you use an automatically assigned DHCP IP address for your laser, that the IP that is automatically assigned to the Laser can change, especially if your laser if off for extended periods of time. Advanced DHCP setup in your router can alleviate this but given the number of router brands and interfaces out there, you will need to refer to your brand' specific instructions and be able to navigate around in the DHCP space (Knowing terms, what to look for, how DHCP works etc).
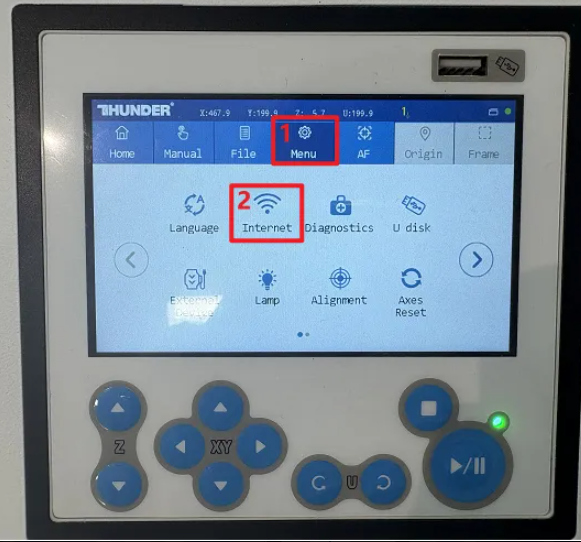
- On the touch panel, navigate to the network settings and confirm that the WiFi connection is established.
Open the Internet Connection Menu
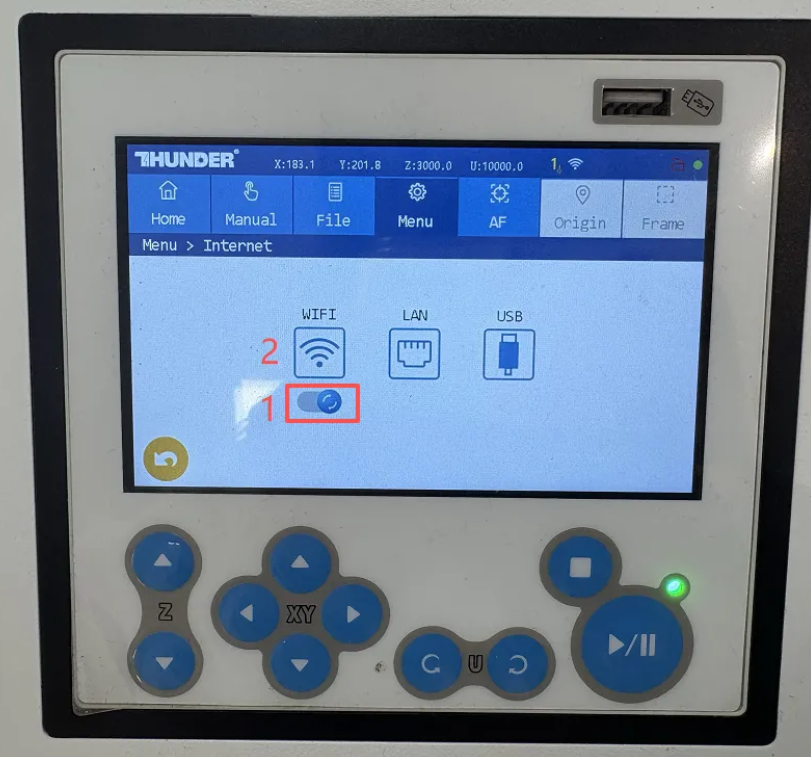
Select WIFI
Select your Wifi Network
Enter Password and Connect
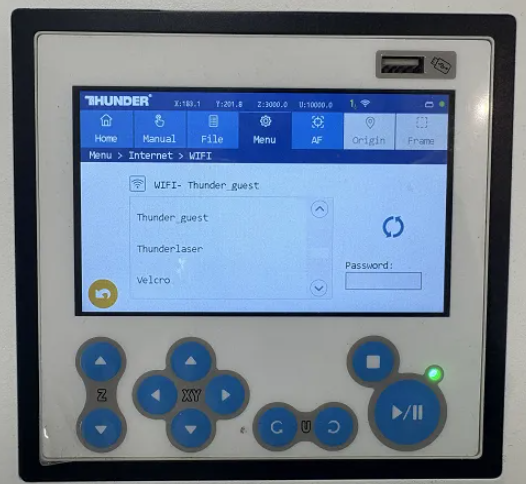
Select your network from the list and enter your password. You may need to refresh. If your WIFI signal is weak, it may not show up.
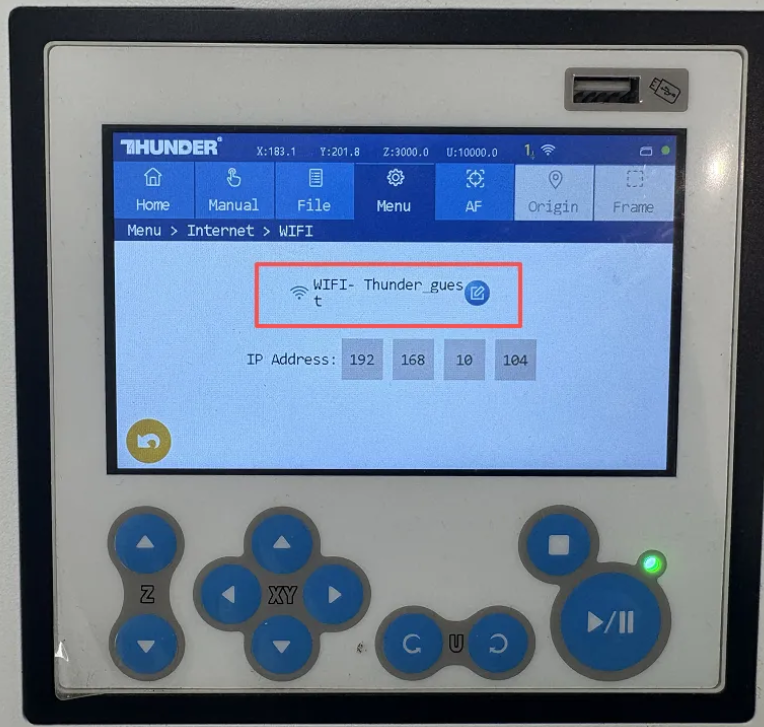
Take note of the IP listed for your WIFI Connection, you will need it for your control software If the above picture, the IP 192.168.10.104.
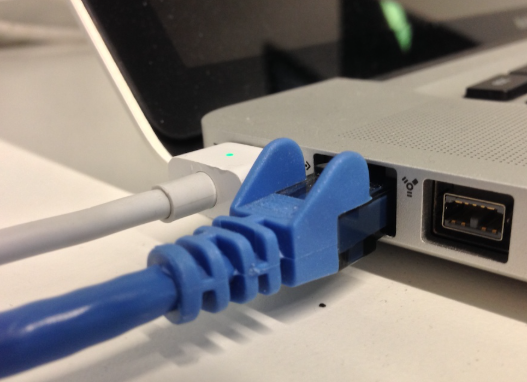
LAN Ethernet ConnectionThis connection will be referred to as the Direction Ethernet connection using an ethernet cable with Rj45 ends.
Connect the laser machine to computer with the Ethernet cable that is provided with the machine or a longer one if needed.
At the Machine At your Computer 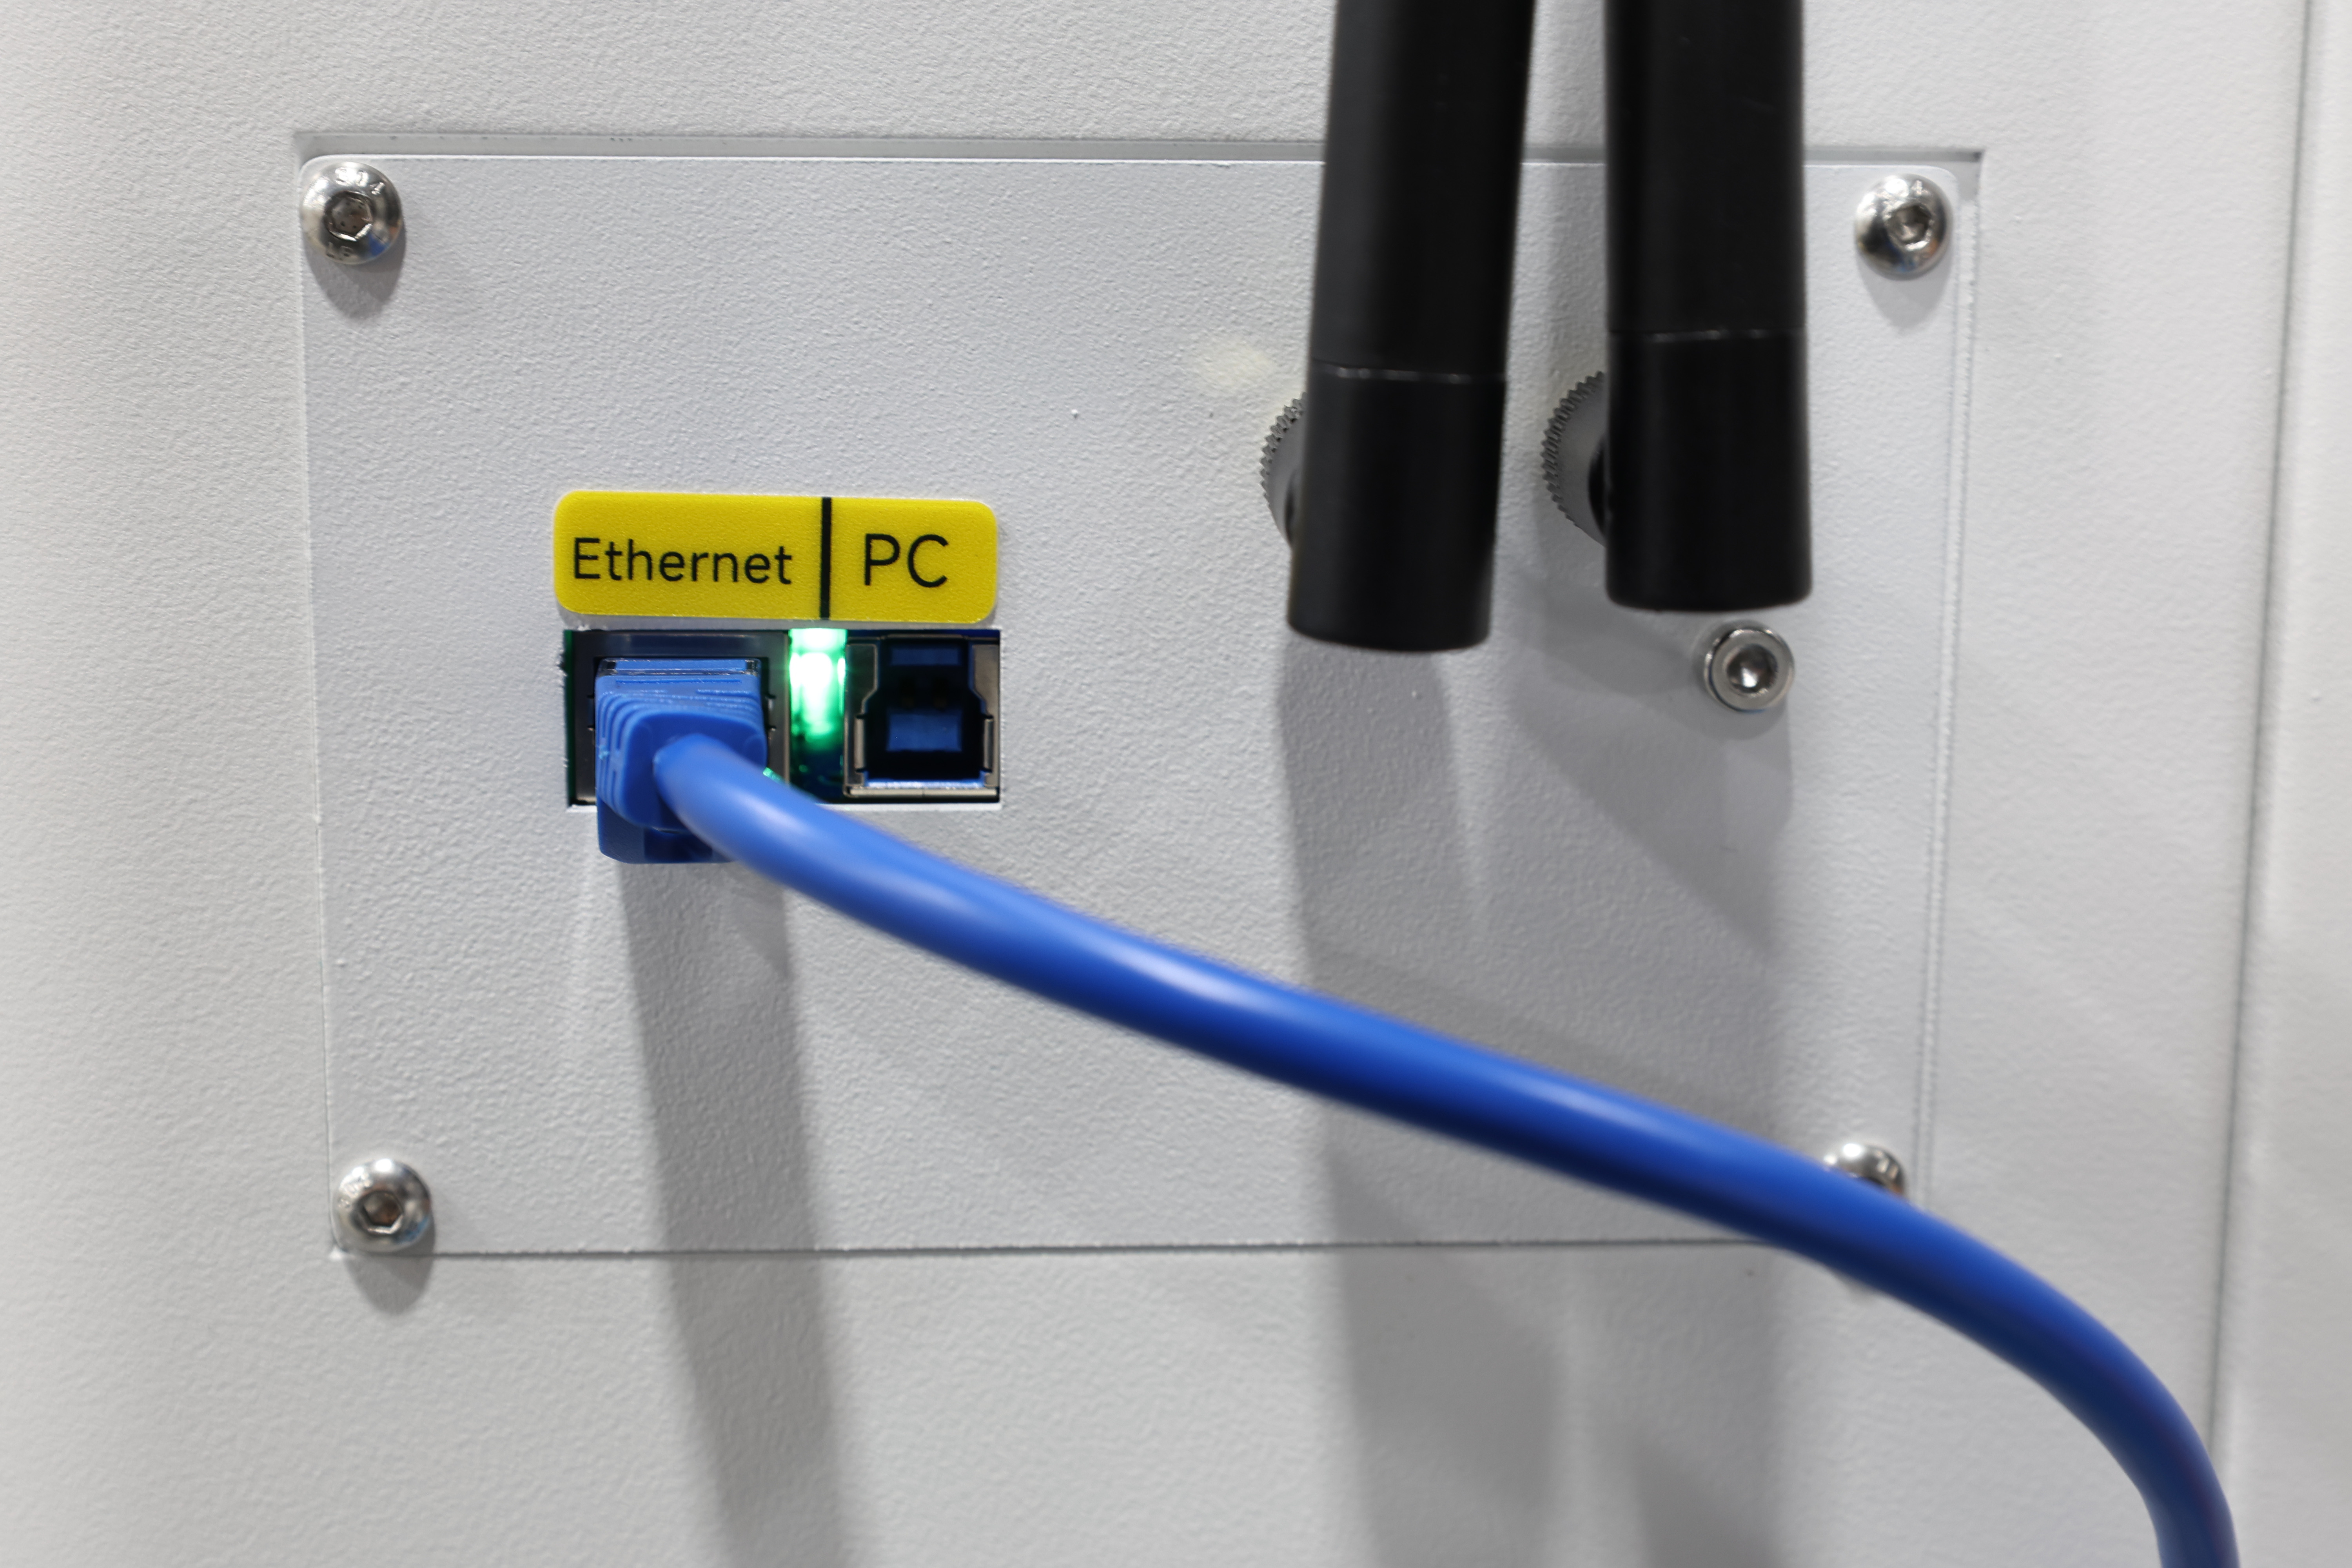
Once you are physically connected, you will need to configure the connection. See the section below about Determining and Configuring your IP.USB ConnectionDue to the Titan series being equipped with a WiFi board and utilizing an integrated transmission architecture, its connection mechanism differs from other lasers. There is not a true "USB" connection method. Even though the connection cable is USB, it will act like a USB to ethernet converter compatible with Windows Only.
The USB cable must be plugged in first to your machine and your computer (that is already powered up) , and then the laser machine power must be turned on. If the order is reversed (power on first and then plug in the USB cable), your computer will not be able to recognize the device, resulting in connection failure. Once the proper order is followed, a new Ethernet Connection should be created on your Windows PC.
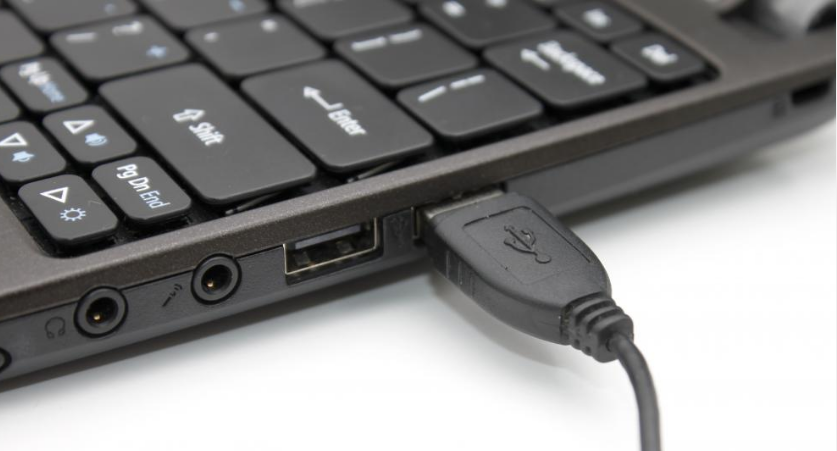
Plug in the USB 3.0 USB-A to USB-B:
USB-B At Machine USB-A At Computer 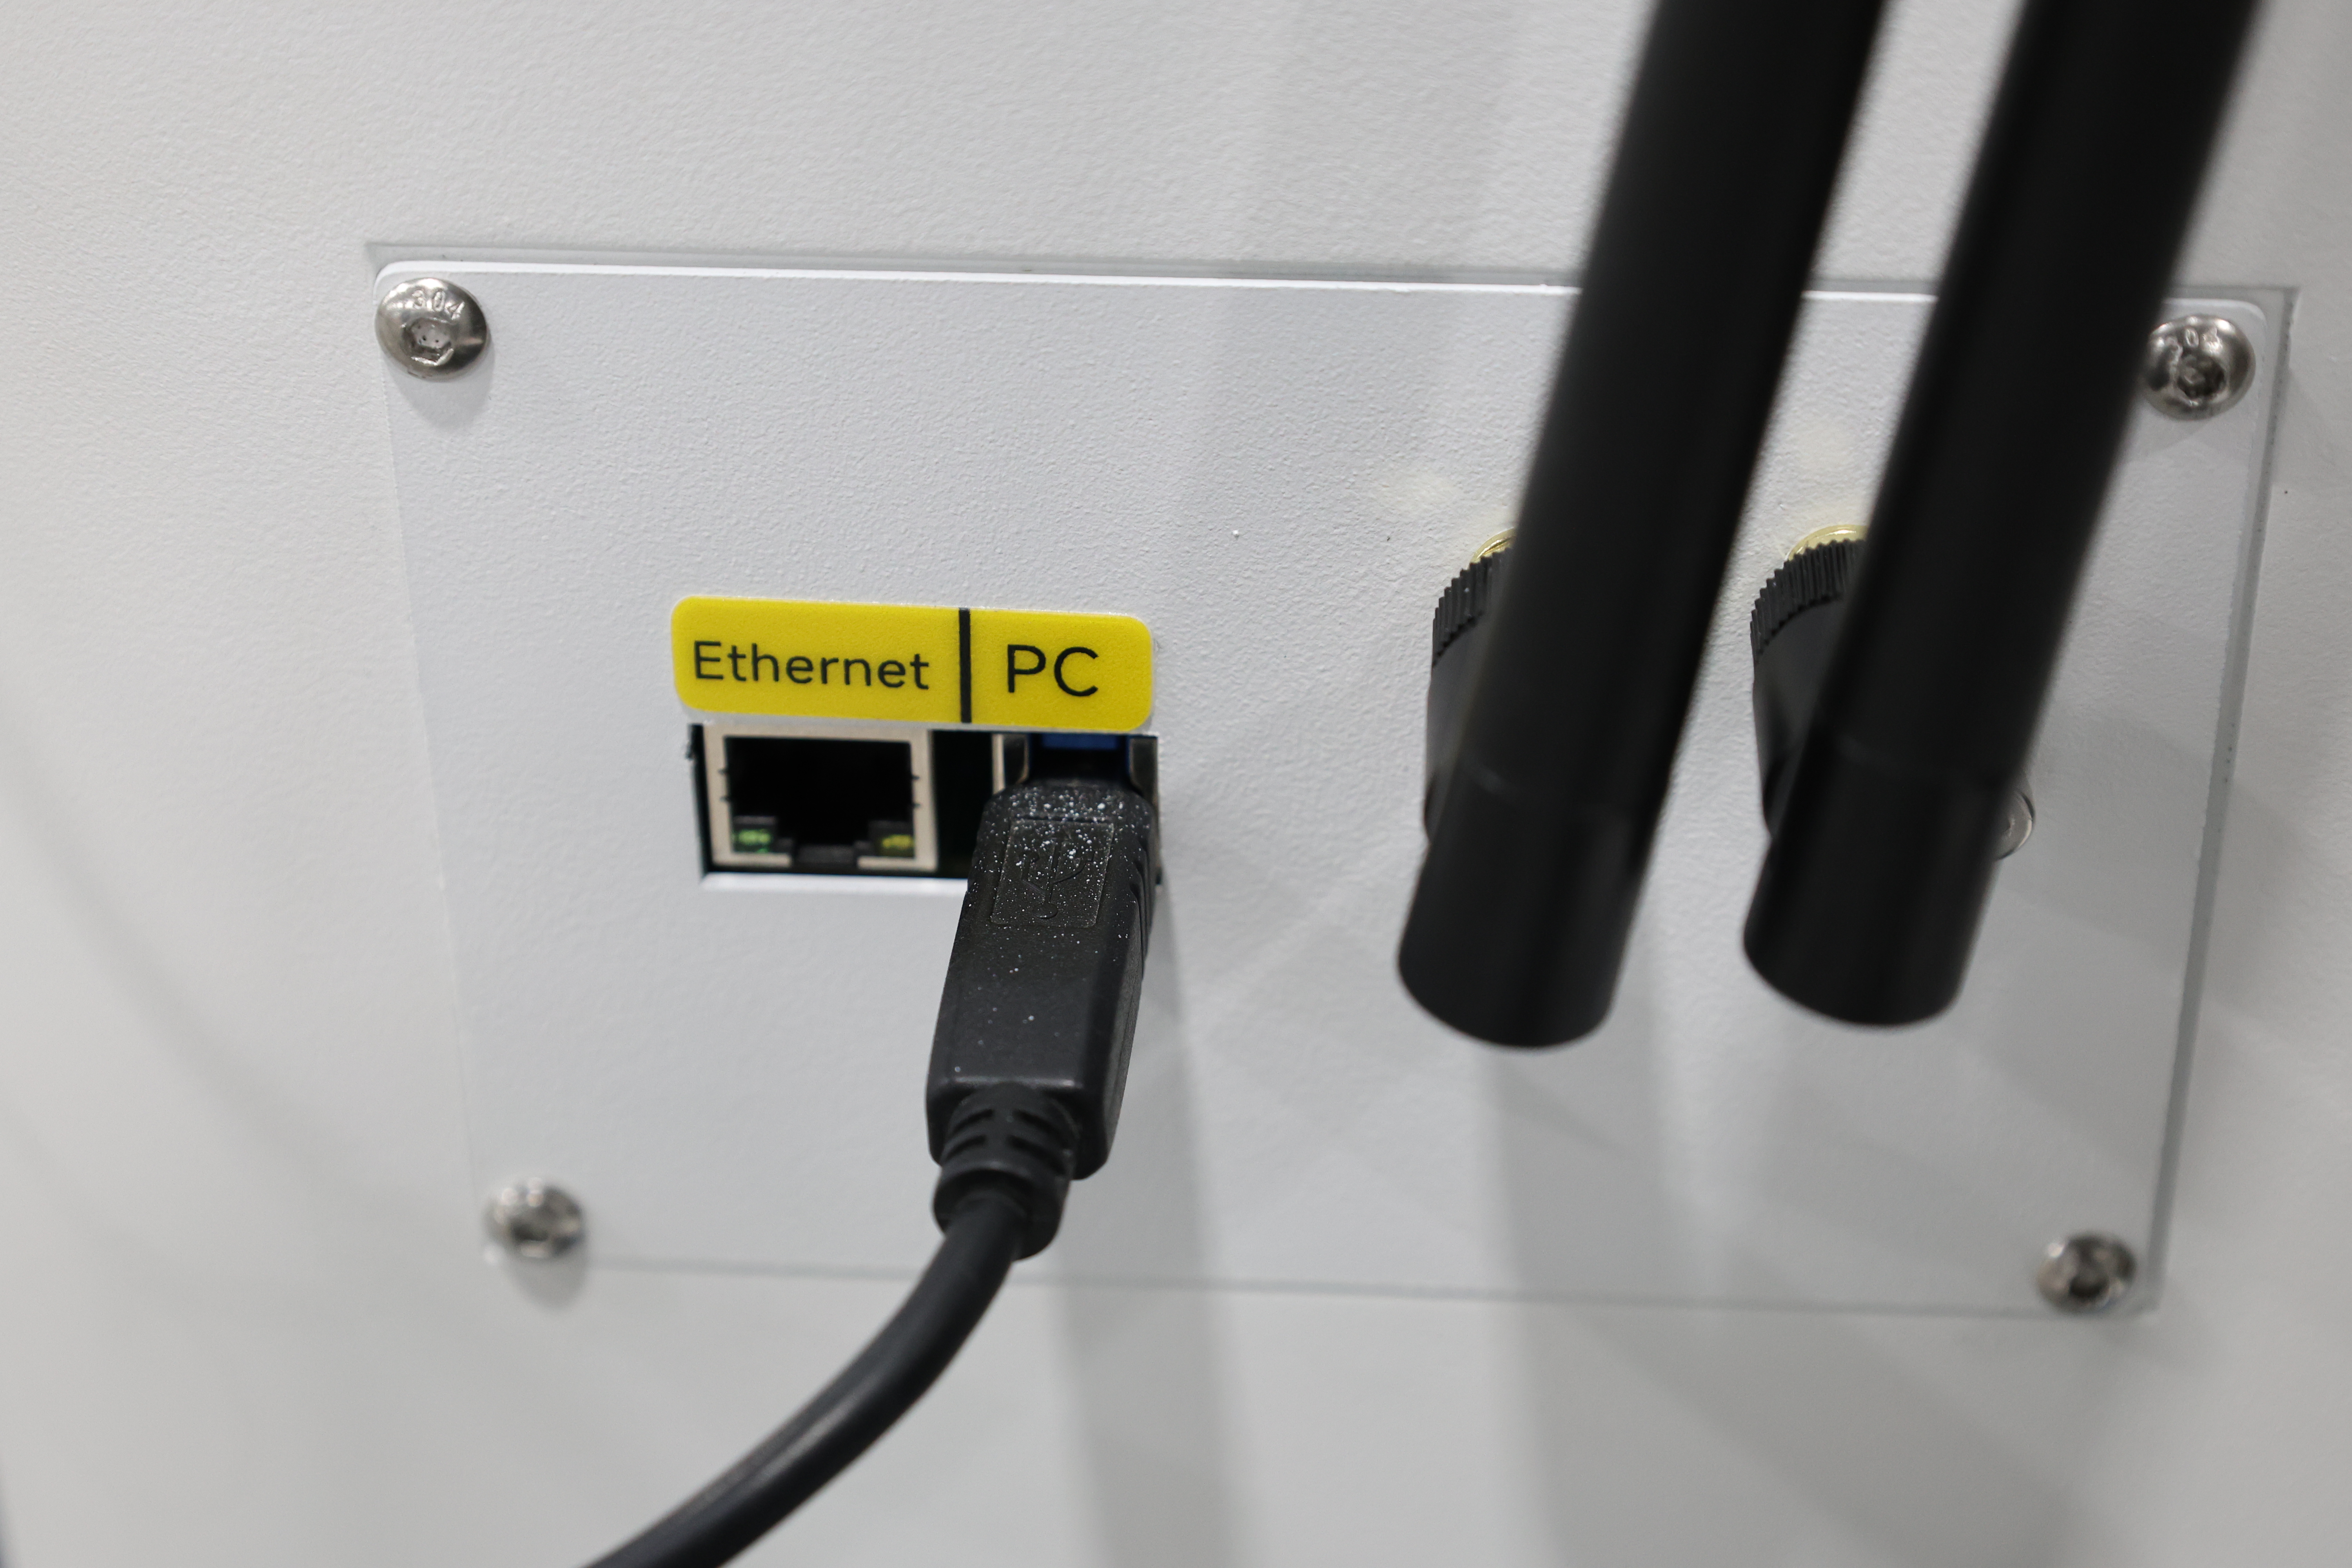
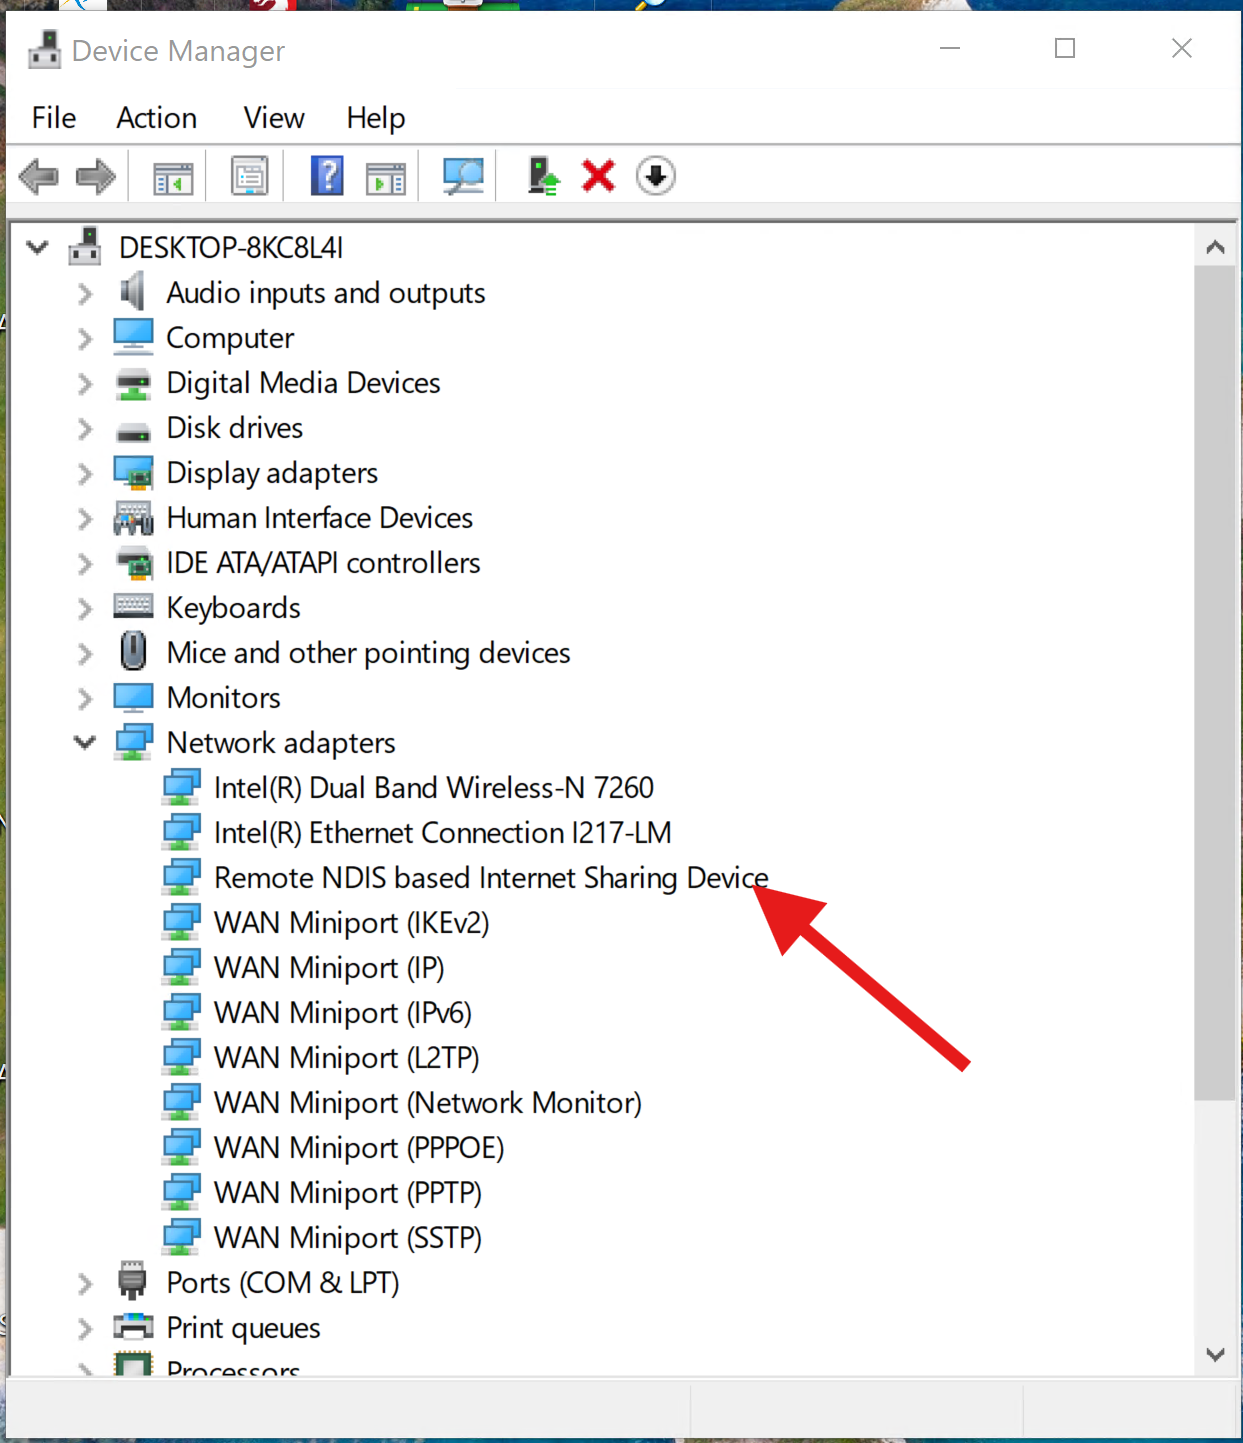
Verify the new USB to Ethernet Connection Exists:
Open a "Network Connection" window and look for the new ethernet connection. Yes...it will be a network connection over the USB cable, akin to a USB to Ethernet converter. The new connection will also show up in the "Device Manager" as shown in the table.
Network Connection Window Device Manager 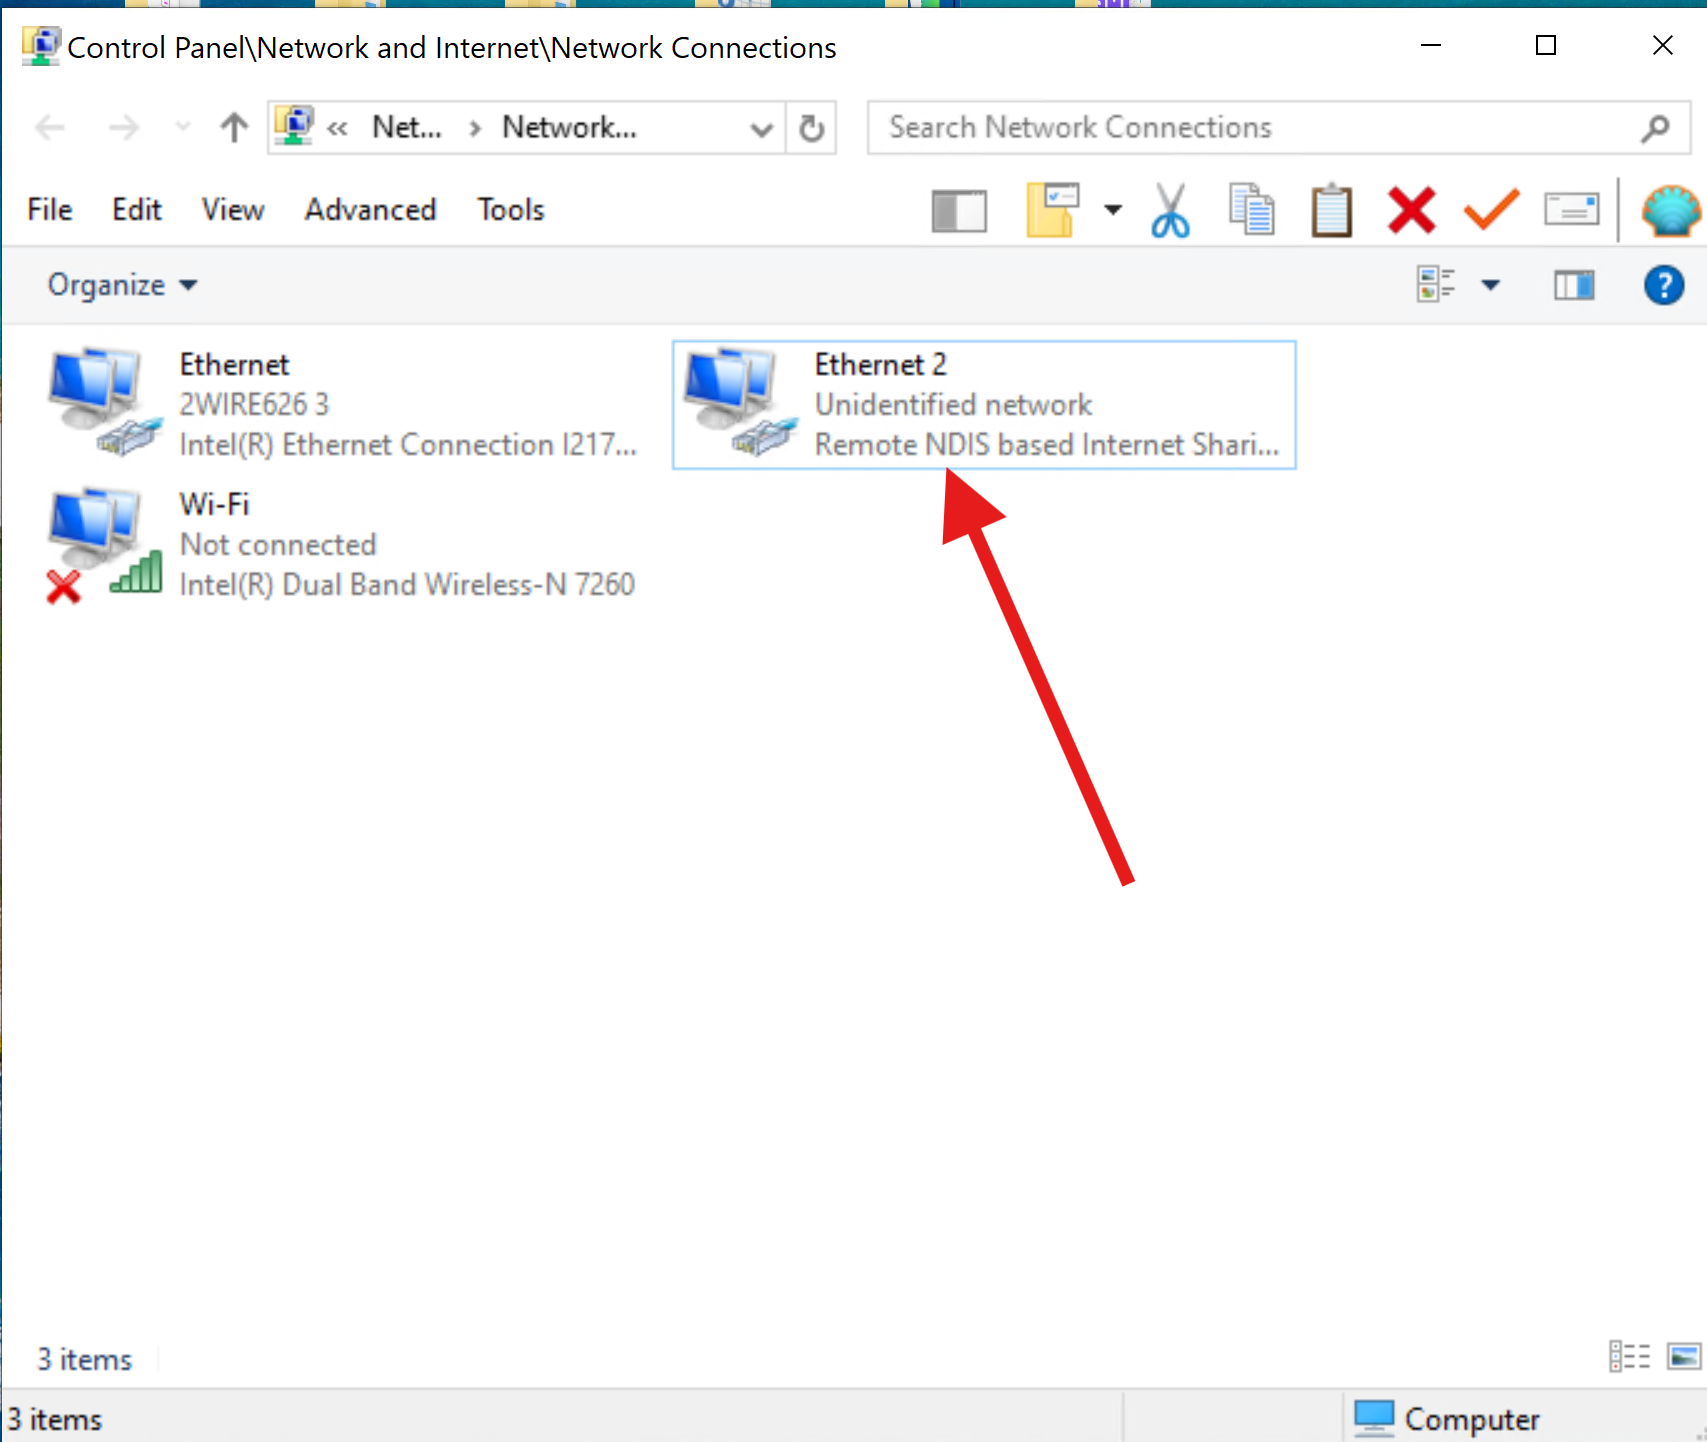
Once you are physically connected, you will need to configure the connection. See the section below about Determining and Configuring your IP.
WIFI Connection
To connect via Wi-Fi, you need to ensure that both the laser machine and your computer are connected to the same Wi-Fi network. Also note that if you use an automatically assigned DHCP IP address for your laser, that the IP that is automatically assigned to the Laser can change, especially if your laser if off for extended periods of time. Advanced DHCP setup in your router can alleviate this but given the number of router brands and interfaces out there, you will need to refer to your brand' specific instructions and be able to navigate around in the DHCP space (Knowing terms, what to look for, how DHCP works etc).
- On the touch panel, navigate to the network settings and confirm that the WiFi connection is established.
|
|
|
|
|
Take note of the IP listed for your WIFI Connection, you will need it for your control software If the above picture, the IP 192.168.10.104.
LAN Ethernet Connection
This connection will be referred to as the Direction Ethernet connection using an ethernet cable with Rj45 ends.
Connect the laser machine to computer with the Ethernet cable that is provided with the machine or a longer one if needed.
At the Machine | At your Computer |
Once you are physically connected, you will need to configure the connection. See the section below about Determining and Configuring your IP.
USB Connection
Due to the Titan series being equipped with a WiFi board and utilizing an integrated transmission architecture, its connection mechanism differs from other lasers. There is not a true "USB" connection method. Even though the connection cable is USB, it will act like a USB to ethernet converter compatible with Windows Only.
The USB cable must be plugged in first to your machine and your computer (that is already powered up) , and then the laser machine power must be turned on. If the order is reversed (power on first and then plug in the USB cable), your computer will not be able to recognize the device, resulting in connection failure. Once the proper order is followed, a new Ethernet Connection should be created on your Windows PC.
Plug in the USB 3.0 USB-A to USB-B:
USB-B At Machine | USB-A At Computer |
Verify the new USB to Ethernet Connection Exists:
Open a "Network Connection" window and look for the new ethernet connection. Yes...it will be a network connection over the USB cable, akin to a USB to Ethernet converter. The new connection will also show up in the "Device Manager" as shown in the table.
Network Connection Window | Device Manager |
Once you are physically connected, you will need to configure the connection. See the section below about Determining and Configuring your IP.
Setting up the connection:
Pick out your IP and Configure your Computer and Machine
Ok so this will be a fun section as there are 3 connection methods, 2 operating systems and 3 possible control software's (If you include RDworks) to use..... so it starts to get complicated. Your exact scenario cannot be covered explicitly, so you will need to read through the guides and make decisions on what your IP should be and configure everything properly. Pay attention to the configuration of your IP as a single incorrect digit will cause the communication to not work.
The WIFI connection is the easiest to set up in the control software, you will just need to put the machines IP into the control software. For the other two methods, you will need to configure your computers network connection that is dedicated for the laser and the control software. You can refer to these two articles for guidance in picking out your IP's and then come back to this article for where to enter them in LaserMaker or Lightburn.
IP Determination:
When selecting an IP for your laser machine and computer you should avoid ending the IP with .0 or .255. So do not use x.x.x.0 or x.x.x.255 IP addresses, especially if your subnet mask is 255.255.255.0.For the LAN and USB to Ethernet ,you will need to assign the IP to your connections and take into account the other networks on your computer (Wireless, other LAN etc). We have two guides for that, they will discuss connecting to Lightburn, but if you choose to connect to LaserMaker, come back to this article and see the information below.
How to Configure the USB to Ethernet Connection:
Where to set the IP in LaserMaker
Open up LaserMaker and start a new project. If you already have a device created, you can EDIT the current device.
| Press the Create button | |
Select ThunderLaser and Titan | Select TCP/IP and enter the IP of the Titan |
Click the Test button to check for configuration success. If you cannot get it to pass, double check your configuration. Once you pass, click the Next Step button. |
Name your Titan | Summary |
Once you have name, click the Next Step button. | Click the Finished button. |
You should then be able to select your Titan and press the Connect button.
Reference Articles:
Related Articles
Titan Series Getting Started
***This article is a work in progress, we are working to complete all the Coming Soon items. If you have a specific question or need, please email us at support@thunderlaserusa.com *** Introduction: So you just bought a new Thunder Laser Titan? This ...New FTDI Driver Solves Mac USB Issues
Preface: This article covers the new FTDI driver that you can install to mitigate communication issues (File transfer failed, unable to connect, disconnected, file transfer glitches) that are commonly seen on the MAC OS with a direct USB connection. ...MAC Connecting A Thunder Laser To LightBurn Via Ethernet
Preface: This article describes how to set up a direct connection to the machine which omits routers, hubs and switches that can add complexity and may not work even if you are able to ping the machine. If you are connecting your laser through a ...Windows Connecting A Thunder Laser To LightBurn Via Ethernet
This article describes how to set up a direct connection to the machine which omits routers and switches If you are connecting your laser through a Router, then this article is not the one you need, please see this guide instead. There are multiple ...Connecting A Thunder Laser To LightBurn Via Ethernet
Preface: This article covers an overview of the connection types (Adhoc\Direct vs through a Router\Switch) for the Ethernet connection from your Computer to your Laser Machine. Note: The Ethernet connection is not Plug and Play and requires ...
If you are a Thunder Laser USA client and still need Technical Support after exhausting the resources in the Knowledge Base, simply email support@thunderlaserusa.com and the Technical Support Team will promptly assist you! You can also use the form here.
Information contained in this Knowledgebase, on this page, in this or any other Article etc. is the property of Thunder Laser USA and shall not be copied, re-used, sold etc. Do not copy, distribute, or reproduce without express written permission from Thunder Laser USA.