Thunder Laser External Air Compressor Guidelines and Install
Preface: This article describes adding 3rd party bolt-on performance peripherals. Your stock Thunder Laser will run to our specifications right out of the box with the included high quality accessories. This guide is catered to the newer Dual Air Thunder Laser Nova ,Odin, Bolt and Titan machines.

Setting your pressure higher than 55psi can cause your solenoids to prematurely fail. Any damage from the over-pressure to any machine component will not be covered by warranty. We HIGHLY recommend running nor more than 30-40PSI as this seems to be optimal for the flow rate of the tubing and in a safe zone for potential spikes from the compressor.
Before you begin:
Take note of the information outlined in this below:
Machine Air Inlet Connection Point
| Point of Interest | Reference Picture |
Where to Connect the Air toL You will plug your new external air feed line into where the original pump was plugged into. It will be on the back of the machine. For Nova Series, it is on the side by the chiller connections. For ODIN, Titan and Bolt PRO series it is underneath the tube box area on the back, below the power connections. |
Where to power the Compressor From
| Point of Interest | Reference Picture |
Where to Power the Compressor From You will need to power the External Air Compressor from its own dedicated Electrical connection. Do not under any circumstances power the External Air Compressor from the stock Air Pump power port NEVER POWER AN EXTERNAL COMPRESSOR FROM THE LASER POWER PLUG ON THE BACK. IT MUST HAVE ITS OWN DEDICATED POWER SOURCE. |
What Pressure to Set on External Air Compressor
| Point of Interest | Reference Picture |
What pressure to Set on the Compressor Regulator Thunder recommends setting the supply regulator on the External Air compressor at least 20psi higher than what is set on the Machine Air Regulator but no higher than 90psi You should monitor the regulator while the machine runs to check for pressure drop and adjust as needed.  Pressure is set "Static" while air is not flowing. If you set the pressure while air is flowing, the "Static" pressure will be much higher. | (Adjust the knob on the compressor to set to the pressure after the tank is full) |
What Pressure to Set on Laser Machine
| Point of Interest | Reference Picture |
What Pressure to set on the Machine Air Regulator You can set the pressure between 5-55psi. We recommend staying below 50psi to allow for regulator variability. Pressure is set "Static" while air is not flowing. If you set the pressure while air is flowing, the "Static" pressure will be much higher.  Setting your pressure higher than 55psi can cause your solenoids to prematurely fail. Any damage from the over-pressure to any machine component will not be covered by warranty . | (Adjust the machine regulator after you have adjusted the Compressor regulator) |
Startup/Shutdown Procedure
| Point of Interest | Reference Picture |
Basic Operation and Shutdown Your new setup will not operate the same way as your stock integrated air pump. You will need to turn the External Compressor on and let it fill before beginning to run your laser. You will do this with the manual switch installed on the External compressor. The pressure in the tank will trigger an automatic Pressure Sensing switch to tell the compressor to kick on and off (Be sure to set your max PSI to protect your compressor from Duty Cycle limits, further down in this article) At the end of the day, you need to turn off the compressor, drain the air from compressor and drain the air line on the machine by using the Green High test button on the laser machine. Both the machine and compressor regulators should read 0psi. | (Use your specific Compressor manual to locate the On/Off switch) |
Compressor Maintenance and Moisture
Maintenance:
Be sure to follow your compressors guidelines for proper maintenance and duty cycle.
Moisture:
Be sure to follow your compressors guidelines for proper maintenance and duty cycle.
Moisture:
If you do not have an auto draining type compressor, you should regularly check your tank for moisture and drain it. If you start seeing moisture in your air lines, on your lens etc, the tank is likely holding a lot of water.
Install, Setup and Basic Operation:
The image below is a "High Level" overview of the basic layout of the External Air installation on your machine. Each install will be a bit different, you may have a more complex scenario like multiple machines etc. It is up to the user to plan and implement their specific install based on their needs and to not negatively affect the machine performance.
Additional Install Considerations:
Bolt and Bolt Plus
Titan/Titan Pro
Bolt and Bolt Plus
You will need to unplug the stock air pump electrical connector and hose at the Y and plug in the factory blue hose to the Y. The air pump connector is the tan or green connector next to the Y with the L5 and N5 wires on it (the other connector is your Exhaust, do not unplug it). These component can be found on the left side of the machine.
Titan/Titan Pro
The factory has installed and external port that you can connect to and supply air.
1. Exterior Port
2. Connect port internally to Solenoids at Y, Located behind the left side door(s)
3. Unplug the Stock Air Pump 120v Power. With the machine off, locate the connector for the pump from the left hand side of the machine and unplug it.
*The Nova Plus series is very similar to how the Titan and Bolt series are set up. You can use the Titan/Titan Pro information and perform the same steps for your Nova Plus.
Basic Parts for External Air Connection:
You may need to source some parts online or at your local store prior to installing your external compressor to your machine.
Quick Connect to Air Compressor outlet
Description | Reference Image with Links (click the pic) |
| Air Compressor Quick Connect The common air compressor outlet is a 1/4" quick connect. You should be able to find these at your typical big box hardware store. You will want the Female connection threads so that you can install a Push to Connect air fitting with male threads. (This kit from Home Depot has both) |
1/4 NPT threaded fitting to Push to Connect 6mm Air Tubing
Description | Reference Image with Links (click the pic) |
| Quick Connect to Push To Connect Air Fitting This fitting will adapt the Quick Connect fitting to 6mm (1/4") air tubing so that you can run the tubing to your regulator inlet. This fitting will be harder to find at your local hardware store. You can use fittings meant for 1/4" tubing as well. Commonly used to adapt the Compressor Quick connect and your regulator to Air tubing. |
Air Tubing
Description | Reference Image with Links (click the pic) |
Air Tubing You will need some 6mm tubing. It is best to get a kit with a variety of fittings to have on hand and it is only a few bucks more. This kit also comes with a tubing cutter and thread sealant tape which is good to have for all the threaded fittings. |
Air Regulator
Description | Reference Image with Links (click the pic) |
Regulator\Water Separator This is an example of a Regulator with some water separators on it. There are many options online, better brands, higher cost versions etc. You need to find the one that meets your budget and needs. You also need to note what the thread of the inlet and outlet are so that you can purchase the proper fittings to adapt to 6mm tubing. The model shown has 1/4" NPT but there are options for other sizes. |
Things to consider when selecting a compressor:
Each user will need to decide which compressor fits their needs, which could be power, space and budget and so on.
Compressor Specs and Sizing
Topic | What to Consider |
Cubic Feet per Minute (CFM) Rating As you increase the pressure of the line, the amount of CFM required will also increase. If you set the pressure too high, you will drain the tank if the compressor cannot exceed the CFM. So as you buy a compressor, compare the CFM rating at 40psi. Take note of the chart from Engineering Toolbox showing the relationship of Flow and Pressure settings. Note that the 6mm tubing will flow similarly to the 3/16" hose shown. | 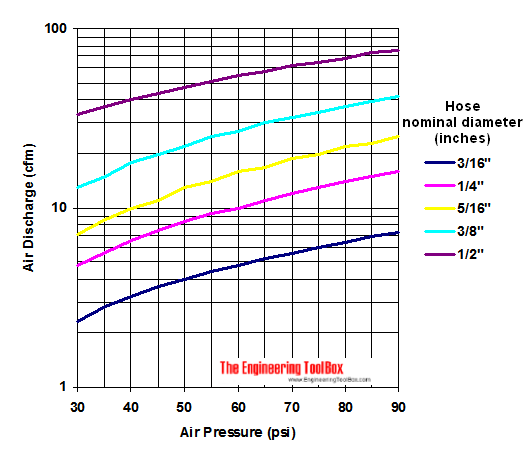 |
Tank Volume Tank volume will allow for longer run times between compressor cycles but the trade off is the space that the compressor will take up. If you plan to run a higher pressure, then you should consider having a higher volume tank. |  |
Duty Cycle As the tank is depleted, the compressor has to cycle on and off to fill it back up. This is the duty cycle. Most compressors like a 70% duty cycle. You can find some that are 100% continuous rated cycle. If you have the pressure set too high, the compressor will have to exceed the Duty Cycle to keep the tank filled. And if you exceed your tanks CFM and Duty Cycle, the tank may actually empty out while your laser is running. | |
| Noise Level Each compressor manufacturer may have a "Quiet" rating on their compressor but not all of the ratings are the same. Depending on your space, you may want a very quiet compressor. Generally speaking the lower the noise rating, the more expensive the compressor will be. The noise will be rated in dB. The lower the dB, the quieter the compressor | |
Power Requirements 120v or 220v and current rating of the compressor itself. Generally the larger the compressor, the higher the amp draw which is why they will build them for 220v since that basically halves the current draw. Make sure you have the proper break, wiring and ampacity for the compressor you select Do not power your external air compressor from the laser machine. The external air compressor should be on a separate dedicated circuit | |
Budget Buy once, cry once. Get the compressor that fits all your needs but one that is also in your budget. |
Pressure/Flow Limits
The factory setpoint limit is 55psi, but can your compressor keep up?
Most compressors are rated for a 70% duty cycle (Higher priced ones will run 100%) and can produce a CFM (cubic Feet Per Minute) rating of air at 90\40psi on the compressor spec sheet. Be sur to check yours!
If your compressor produces a low CFM then it will not be able to keep up with your High Air pressure consumption rate. The tank will start out full, start to empty and then the compressor kicks on.......but it will not fill back up and you will run out of air.
To Test:
1. Fill up your compressor and set your PSI at the laser machine regulator to 40psi (compressor regulator at 90psi) and then use the TL timer board to trigger your Air Assist control( Testing/Adjusting Peripheral Systems using The TL Timer) or your External Devices menu on your Bolt/Titan and open up your high air assist all the way.
2. Start a timer and watch the gauge on the Air Compressor lower PSI until the compressor kicks on. Mark that time down as TTE (Will use later). Then time how long it takes for the compressor to fill the tank back up and the compressor shutting off. Mark that time down as TTR (Will use later).
3. If the tank never fills back up and depletes completely, reduce your laser machine regulator static PSI by half and retest until the compressor can fill the tank back up. You can then adjust to a higher pressure and retest to find the limit by repeating step 2.
4. Duty cycle calculation. Skip this if your compressor is rated for 100% duty.
Calculate the duty cycle from the times you marked down in step 2. The units should be in seconds.
Calculate the duty cycle from the times you marked down in step 2. The units should be in seconds.
Time to Empty = TTE
Time to Refill = TTR
Total Time = TTE + TTR
Duty Cycle % = 100*TTR/Total Time
If the compressor is able to operate at less than its rated duty cycle (Say it calculates out to 65% and the rated duty cycle was 70%), then you can raise the Laser Machine Regulator PSI up a few PSI and retest (Step 2) and recalculate until you are satisfied.
Single Air Machine Considerations:
If you have an older machine that does not have Dual Air or an External air port you may need to make some additional modifications to make external air work. You can get a 110VAC solenoid and plug wire it for the stock air pump outlet on the back of the laser or you can get a 24VDC one and go to the trigger of the relay for the air pump. Then run your external air compressor through the solenoid. Thunder Laser USA does not currently offer a Single to Dual air assist conversion kit.
Example Setup of External Air:
When running your compressor in another climate compared to your machine, you will want to be diligent about moisture.
Related Articles
Thunder Air Fume Extractor
THUNDER AIR Thunder Air: Fume Extraction Solution Built for Clean, Safe, and Reliable Production Specification Thunder Air 700 Dimensions 475x605x972 mm / 18.70" x 23.82" x 38.27" Airflow MAX. 700 m³/h / 412 cfm Air Pressure MAX. 4000 Pa Compatible ...Air Solenoid Differences
Preface: This article covers the different models of air solenoids used on Thunder lasers. Thunder Laser has used the three different types of solenoids as shown below. All 3 are still the same hose input sizing and 24V solenoids. You should be able ...Plug Adapters for External Exhaust Fans and Stock Compressor
Preface: This article covers information about the different plugs, sockets and adapters used for the stock exhaust and air pump power connections. About the Exhaust Fan and Air pump socket: The back of your Thunder Laser machine has C14 socket to ...Troubleshooting why Air is not flowing on a Thunder Laser with Air Assist
Preface: This article covers the troubleshooting steps for when you are having air assist flow issues on your Thunder Laser. Applies to: Thunder Laser machines equipped with an Air Assist system (Nova, Nova Plus, Odin, Bolt, Bolt Plus, and Titan ...Quantifying Air Assist Pressures
Introduction The air assist is critical for keeping flare-ups at bay, mitigating smoke, helping keep the lens cleaner and cooler (it really shouldn't get that hot if it is in proper order anyway), and, when cutting, catalyzing the ablation of ...
If you are a Thunder Laser USA client and still need Technical Support after exhausting the resources in the Knowledge Base, simply email support@thunderlaserusa.com and the Technical Support Team will promptly assist you! You can also use the form here.
Information contained in this Knowledgebase, on this page, in this or any other Article etc. is the property of Thunder Laser USA and shall not be copied, re-used, sold etc. Do not copy, distribute, or reproduce without express written permission from Thunder Laser USA.