Using Laser 2 Output To Test For Possible Laser 1 Output Anomaly
This procedure is how to use the Channel 2 output in place of the Ch1 output on your Laser Machine.
Step 1: Backup Machine Settings to computer
Once the settings load, save them. If you are getting an error, remedy that and click the Read button to read from the controller.

Step 2 Make Machine Settings Adjustment :


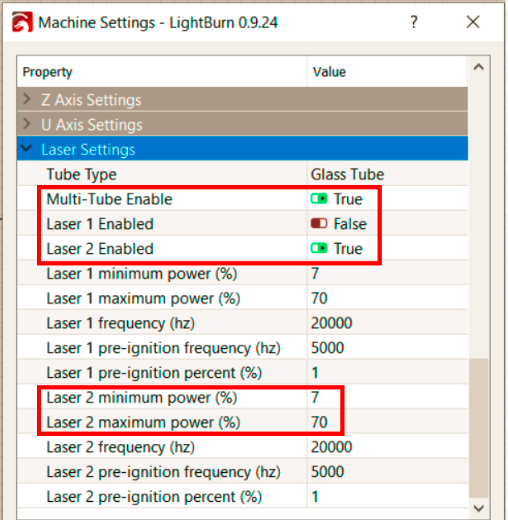
Laser Settings section:
*In newer versions of Lightburn, you may be prompted to be able to see these settings, click 'ok' to the prompt.
(For ODIN Series, the values for Laser Min and Max power will be 1 and 99 by default, NOVA series shown in picture below and is 7 and 70 by default)
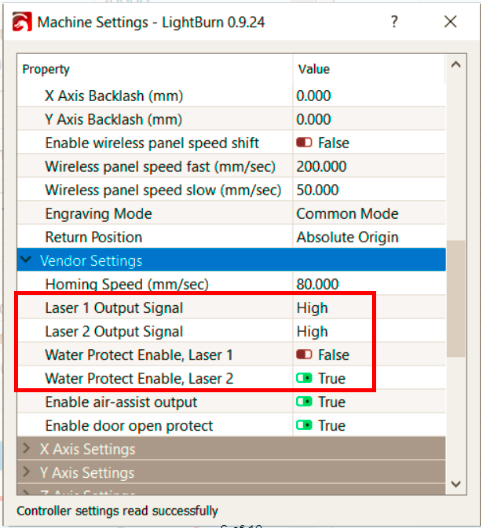
Vendor Settings Section
Once you have changed all the items in the red boxes, at the bottom of the Machine Settings Window click the Write Button first and then the Read Button to re-read. Verify all settings were written. If not, change again and Re-Write and Re-Read.
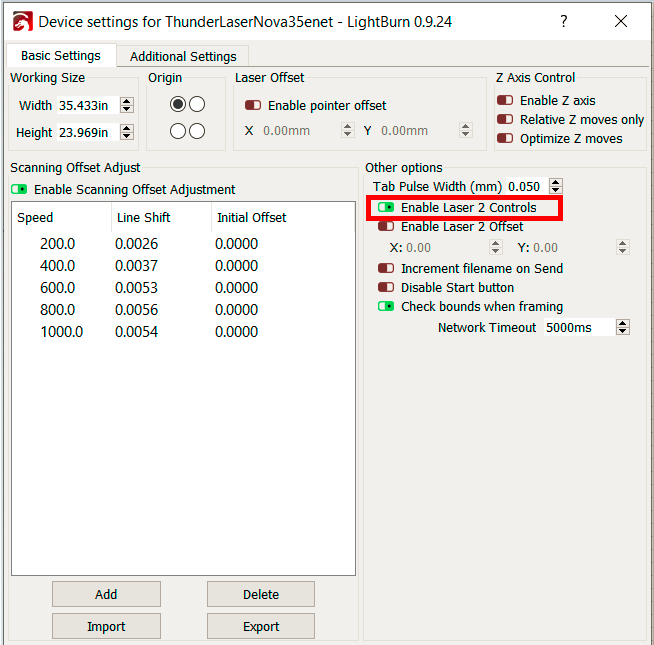
Step 4: Adjust lightburn Device Settings
Enable Tube #2 control in Lightburn by going to Edit>Device Settings:
Click 'ok'
Step 5 Change Controller Output Channel Wiring:
Power off the machine and move the green connector on the Ruida Controller from CN5 to CN6 and CN6 to CN5
Step 6 Adjust your Lightburn Projects:
Adjust all your layer settings to use Tube 2 instead of Tube 1 and resend your project:
*Files on the machine are likely set up for Ch1 tube and will not be able to be used. You will need to re-create and re-send to the machine.
Related Articles
LightBurn Material Test File
Preface: The article covers some pre-made material test cards and the built in Lightburn Material Test Generator for CO2 lasers like the Thunder Laser Bolt, ODIN and Nova machines Quick Start Videos: Thunder Material Test Lightburn Material Test ...Legacy Lightburn Material Test File
Preface: The article covers some pre-made material test cards and the built in Lightburn Material Test Generator for CO2 lasers like the Thunder Laser Bolt, ODIN and Nova machines Quick Start Videos: Legacy Material Test Cards Lightburn Material Test ...Nova Laser Tube Will Not Fire or is Low on Power- LPSU Test
Preface: This article covers the "Red Button Test" which is a great first test when you have Laser Power issues. The red button test eliminates the OPTO and RUIDA inputs, isolating the system to just the tube and the LPSU. If this test is a success, ...Thunder Laser Nova Laser Power Supply (LPSU) Output Current Test Procedure
Preface: This is a diagnostic procedure to collect data on the output of the LPSU. It is not necessary to perform this unless instructed to do so by Thunder Laser USA Support & Innovation Labs. But you can if you like. This instruction is specific to ...Thunder Laser Nova Series: Focal Ramp Test
Lenses, Usage and Ramp Test Focal Ramp Test. Finding the perfect focal point (smallest dot size) can be difficult. Many lenses have a threshold or manufacturing tolerance that can vary up to 2-3mm. Take a standard 2" lens for example, it's possible ...
If you are a Thunder Laser USA client and still need Technical Support after exhausting the resources in the Knowledge Base, simply email support@thunderlaserusa.com and the Technical Support Team will promptly assist you! You can also use the form here.
Information contained in this Knowledgebase, on this page, in this or any other Article etc. is the property of Thunder Laser USA and shall not be copied, re-used, sold etc. Do not copy, distribute, or reproduce without express written permission from Thunder Laser USA.